Expert Advisor Tutorial - EA Studio Forex
The Expert Advisor Tutorial is a Tutorial for Forex Trading. Fintechee’s tutorials Focus on Expert Advisor. Expert Advisor Studio Download is not required.
Tutorial for Forex Trading is one of Fintechee’s free services. We help traders learn how to trade Forex by using our WEB Trader or Expert Advisor Studio (EA Studio Forex). The contents here will not be limited to the field of Forex. Any instrument of investment will be discussed.
Expert Advisor Tutorial Video
Description
This Expert Advisor Tutorial is about the Expert Advisor architecture of our WEB Trader. Expert advisor is very important to analyze market movements and to provide Trading Signals. By reading this expert advisor tutorial for Forex trading, traders can learn how to code their own expert advisors(trading robots). It’s a little bit difficult for non-technicians and it’s usually used by advanced traders. So we applied fewer object-oriented programming skills to make it easier for beginners.
The Advantages of WEB-based EA
Hello everybody, today let’s talk about EA.
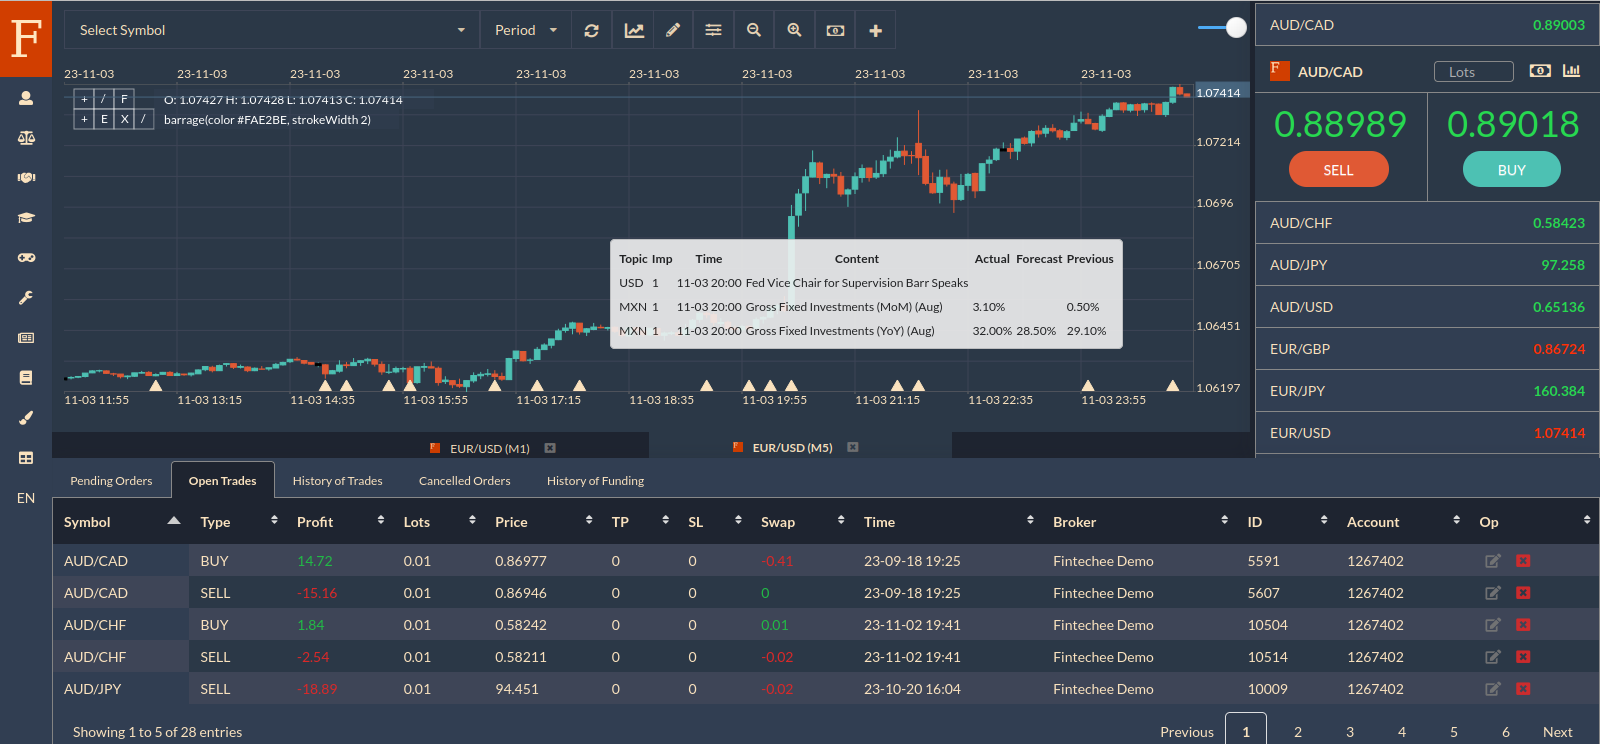
First of all, Please open our home page and then click the “WEB TRADER” button to access our demo and you will be led to our WEB Trader. This is the basis of this expert advisor tutorial for Forex trading.
EA stands for “Expert Advisor”(trading robot) which helps us analyze the market data and generates the signals to help us make decisions: to go long or go short.
Because the market movements are too fast to catch up with and human beings can’t monitor the movements anytime, automation of monitoring becomes necessary. By using EA, you don’t need to sit in front of your PC 24/7.
Some other trading platforms provide automated trading as well. Our WEB Trader is different from them. Our trading platform is WEB-based, algorithms traders needn’t download and install anything. EA can run on the WEB browser straightforward. This feature is very convenient for traders who can’t often monitor the market movements, especially the people who have another work to do.
Because the environment running EA is WEB-based. You need to code your program by Javascript programming language. Cons is that you need to recode your EA and it takes time. But I think it’s worth doing. Why? Because our WEB Trader provides you with the feature to allow you to sign in to several different accounts simultaneously, it is a unique feature that you can’t find in other trading platforms. And EA can run 24/7. Thanks to these useful features, we can monitor the different market data from the different sources of streaming quotes at the same time. Then we get opportunities to trade arbitrage.
In this expert advisor tutorial for Forex trading, we only guide you to develop EAs based on Javascript programming language. For more details regarding Javascript, please refer to other materials, we won’t expand here.
Code Your Own EA on Our WEB Trader
Let’s learn how to code your own EA on our WEB Trader.
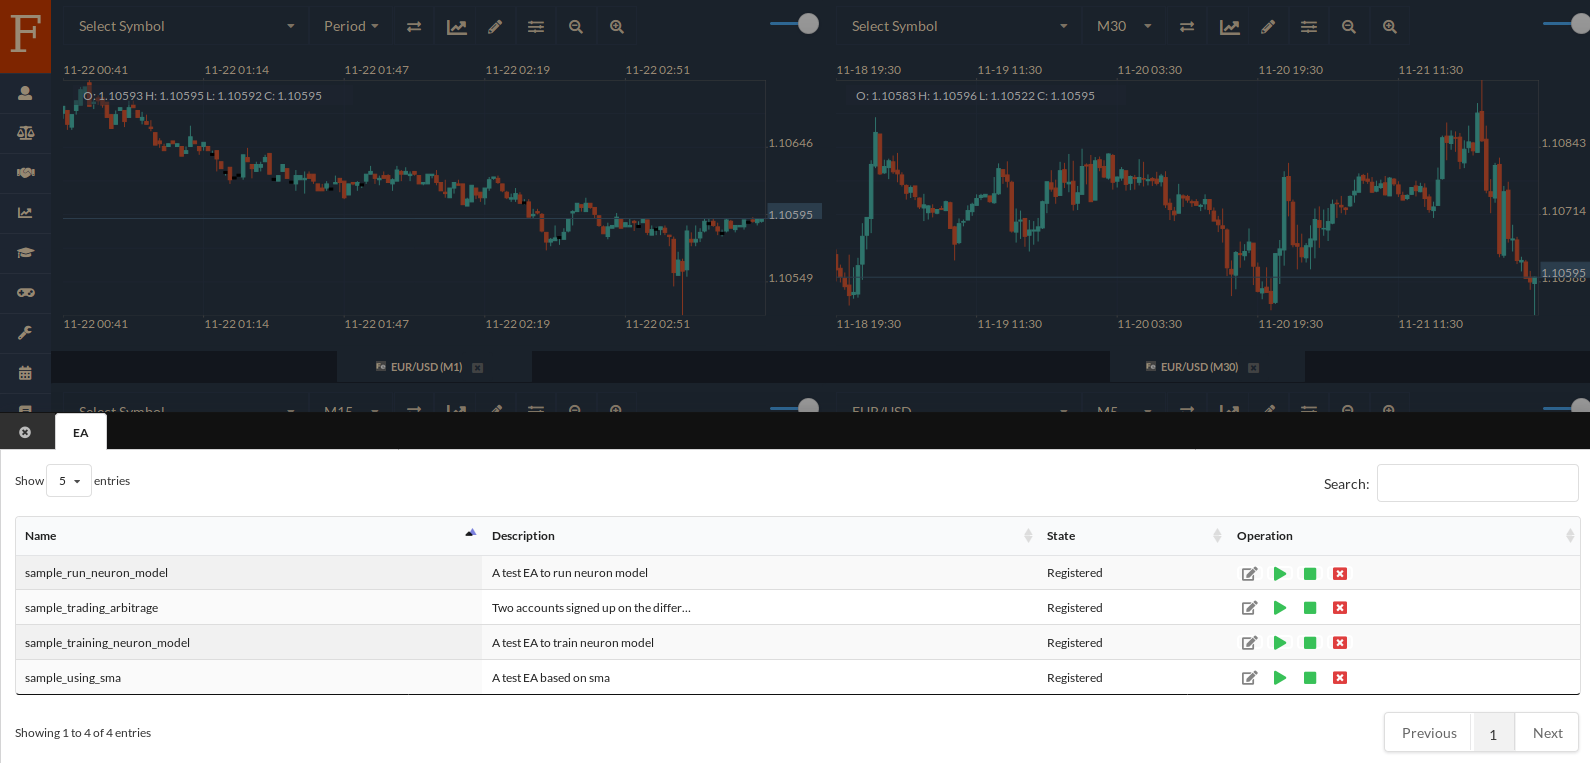
Please click the “Doctor Cap” icon, a panel will show up. The samples of expert advisors are listed in the panel. Every sample shows up as a row with the “Play” icon, the “Stop” icon, the “Edit” icon.
We provided a few samples. If you click the “Edit” icon, a dialog will show up with the source code of the specific sample. You can refer to the source codes and learn.
We published the source codes of the samples on our GitHub repository and the page - SDK Trading as well. You can check the source codes of the samples there.
The Structure of a Standard Expert Advisor
The first thing you need to do for running your own EA is to register the EA into the WEB Trader. We provide you with an API to register your indicator: registerEA. By using the “registerEA” API, you can register your EA into the system and make it visible to the WEB Trader.
This API includes several parameters: “name”, “description”, “parameters”, and 3 callback functions.
registerEA(
"<EA's Name>",
"<Description>",
[{ // parameters
	name: "period",
	value: 20,
	required: true,
	type: PARAMETER_TYPE.INTEGER,
	range: [1, 100]
}],
function (context) { // Init()
	var account = getAccount(context, 0)
	var brokerName = getBrokerNameOfAccount(account)
	var accountId = getAccountIdOfAccount(account)
	var symbolName = "EUR/USD"

	getQuotes (context, brokerName, accountId, symbolName)
	window.chartHandle = getChartHandle(context, brokerName, accountId, symbolName, TIME_FRAME.M1)
	var period = getEAParameter(context, "period")
	window.indiHandle = getIndicatorHandle(context, brokerName, accountId, symbolName, TIME_FRAME.M1, "sma", [{
		name: "period",
		value: period
	}])
},
function (context) { // Deinit()
	delete window.currTime
},
function (context) { // OnTick()
	var arrTime = getData(context, window.chartHandle, DATA_NAME.TIME)
	if (typeof window.currTime == "undefined") {
		window.currTime = arrTime[arrTime.length - 1]
	} else if (window.currTime != arrTime[arrTime.length - 1]) {
		window.currTime = arrTime[arrTime.length - 1]
	} else {
		return
	}

	var account = getAccount(context, 0)
	var brokerName = getBrokerNameOfAccount(account)
	var accountId = getAccountIdOfAccount(account)
	var symbolName = "EUR/USD"

	var arrClose = getData(context, window.chartHandle, DATA_NAME.CLOSE)
	var arrSma = getData(context, window.indiHandle, "sma")

	var ask = getAsk(context, brokerName, accountId, symbolName)
	var bid = getBid(context, brokerName, accountId, symbolName)
	var limitPrice = 0.0003
	var stopPrice = 0.0003
	var volume = 0.01

	if (arrClose[arrClose.length - 3] < arrSma[arrSma.length - 3] && arrClose[arrClose.length - 2] > arrSma[arrSma.length - 2]) {
		sendOrder(brokerName, accountId, symbolName, ORDER_TYPE.OP_BUYLIMIT, ask-limitPrice, 0, volume, ask+limitPrice, bid-3*stopPrice, "", 0, 0)
	} else if (arrClose[arrClose.length - 3] > arrSma[arrSma.length - 3] && arrClose[arrClose.length - 2] < arrSma[arrSma.length - 2]) {
		sendOrder(brokerName, accountId, symbolName, ORDER_TYPE.OP_SELLLIMIT, bid+limitPrice, 0, volume, bid-limitPrice, ask+3*stopPrice, "", 0, 0)
	}
})
The callback functions are similar to the “registerIndicator” API. We have “init” callback function, “deinit” callback function and “onTick” callback function.
The “onTick” callback function is the main function where we have the main program logic. When the tick of the streaming quotes arrives, this callback function will be triggered automatically. It runs very frequently.
The “init” function runs only once before you start running your EA.
The “deinit” function runs only once after you stop running your EA.
Please Note:
- Don’t use global variables to transfer information between the functions. Because we use Javascript’s “eval” API to load the callback functions, global variables can’t be read cross the callback functions.
- Use the “window” object to transfer information. You can set values to the window object’s properties to transfer information.
- If you don’t want to share any information between the functions, you should use local variables. The local variables can’t be visible outside the callback functions.
The “init” Callback Function
Through the “init” callback function, we run the initialization. You can map information in this function to get it again in the “onTick” callback function.
You can pack some values that you want to share into the properties of the “window” object and transfer them to other callback functions.
Monitoring the market movements needs to read the tick data, the historical candlesticks(OHLC) and the output data from the indicators. You can specify the candlesticks of which instrument, the output data of which indicator to read. You can specify them in the “init” callback function and map the “handle” to the candlesticks or the output data from the indicators.
function (context) { // Init()
	var account = getAccount(context, 0)
	var brokerName = getBrokerNameOfAccount(account)
	var accountId = getAccountIdOfAccount(account)
	var symbolName = "EUR/USD"

	getQuotes (context, brokerName, accountId, symbolName)
	window.chartHandle = getChartHandle(context, brokerName, accountId, symbolName, TIME_FRAME.M1)
	var period = getEAParameter(context, "period")
	window.indiHandle = getIndicatorHandle(context, brokerName, accountId, symbolName, TIME_FRAME.M1, "sma", [{
		name: "period",
		value: period
	}])
}
If you want to read the data from the candlesticks, you can call the “getChartHandle” API to get the handle. For example in this expert advisor tutorial for Forex trading, if you need to read M1 timeframe data, you can call this API to create a handle and set the handle to the “chartHandle” property of the “window” object. Please refer to the source code below.
window.chartHandle = getChartHandle(context, brokerName, accountId, symbolName, TIME_FRAME.M1)
In the “onTick” callback function, you can get M1 timeframe data by using the “getData” API. The handle variable returned by the “getChartHandle” API will be set to the “getData” API as a parameter. You need the handle to identify M1 timeframe data.
The “getChartHandle” API is used to create a handle, and the “getData” API is used to get the specific data by the handle. So their functions are different. And another pointer that we need to take care of is that we always create the handles in the “init” callback function. Regarding how to use the “getData” API, please refer to the source code below.
var arrClose = getData(context, window.chartHandle, DATA_NAME.CLOSE)
Please Note:
- Don’t use the “getChartHandle” API in the “onTick” callback function. The performance will be lowered down because the “onTick” callback function runs very frequently and it maps the handle to the repeatedly.
- Use the “getChartHandle” API only in the “init” callback function.
- Use the “getData” API to get the specific data only in the “onTick” callback function.
The handles have two types. One type is called “chart handle”, you can use it to identify the candlestick of which instrument to read. The other one is called “indicator handle”, you can identify the output data of which indicator to read.
In this expert advisor tutorial for Forex trading, we read the output data of “moving average”. So we need to get the “moving average” indicator’s handle. Meantime we read M1 timeframe data, so we need to get M1 data’s handle.
window.indiHandle = getIndicatorHandle(context, brokerName, accountId, symbolName, TIME_FRAME.M1, "sma", [{
    name: "period",
    value: period
}])
To get the output data of the “moving average” indicator, we need to set some value to “period” as a parameter, To avoid hardcoding, we need to make “period” a parameter of the “registerEA” API and get the value of the parameter(“period”) by using the “getEAParameter” API.
var period = getEAParameter(context, "period")
We set “20” to “period” as default. Meantime we need to specify “broke name”, “account ID” accordingly to use the APIs.
Please Note:
- Because our WEB Trader has the feature to allow traders to sign in to different accounts simultaneously, we need to specify which broker, which account’s data to read. Without these parameters(“broke name”, “account ID”), the WEB Trader can’t get data correctly.
- The information of the accounts that we signed in to is contained by the “context” object. We can get the specific account information by using the “getAccount” API.
In this expert advisor tutorial for Forex trading, to simplify the process, we get the information on the default account that we signed in to.
var account = getAccount(context, 0)
var brokerName = getBrokerNameOfAccount(account)
var accountId = getAccountIdOfAccount(account)
The “deinit” Callback Function
The “deinit” function helps us to deinitialize information to release some resources when we stop running our EA.
The “onTick” Callback Function
In this expert advisor tutorial for Forex trading, we use a certain mechanism to avoid running the “onTick” callback function too frequently. The source codes below can make the “onTick” callback function triggered at most once during a period of time.
var arrTime = getData(context, window.chartHandle, DATA_NAME.TIME)
if (typeof window.currTime == "undefined") {
    window.currTime = arrTime[arrTime.length - 1]
} else if (window.currTime != arrTime[arrTime.length - 1]) {
    window.currTime = arrTime[arrTime.length - 1]
} else {
    return
}
The trading strategy that we apply in this expert advisor tutorial for Forex trading is very simple. We use the “Golden Cross” chart pattern.
Once the “close” value of the current candlestick goes up cross the current SMA(simple moving average) value, our EA will generate a signal to go long. Once the “close” value of the current candlestick goes down cross the current SMA(simple moving average) value, our EA will generate a signal to go short.
Because the data type of the candlesticks’ data and the indicator’s the output data is “Array”, we need to specify which element of the array to read. Please refer to the source codes below.
if (arrClose[arrClose.length - 3] < arrSma[arrSma.length - 3] && arrClose[arrClose.length - 2] > arrSma[arrSma.length - 2]) {
    sendOrder(brokerName, accountId, symbolName, ORDER_TYPE.OP_BUYLIMIT, ask-limitPrice, 0, volume, ask+limitPrice, bid-3*stopPrice, "", 0, 0)
} else if (arrClose[arrClose.length - 3] > arrSma[arrSma.length - 3] && arrClose[arrClose.length - 2] < arrSma[arrSma.length - 2]) {
    sendOrder(brokerName, accountId, symbolName, ORDER_TYPE.OP_SELLLIMIT, bid+limitPrice, 0, volume, bid-limitPrice, ask+3*stopPrice, "", 0, 0)
}
Every tick consists of “bid” value and “ask” value, which will be used to send the orders as the referred price. You can use the “getBid” API to get the “bid” value of the current tick data, and use the “getAsk” API to get the “ask” value of the current tick data
var ask = getAsk(context, brokerName, accountId, symbolName)
var bid = getBid(context, brokerName, accountId, symbolName)
We send a pending order in this expert advisor tutorial for Forex trading. A pending order is different from a market order, we set “Buy Limit” or “Sell Limit” to the “order type” as a parameter.
sendOrder(brokerName, accountId, symbolName, ORDER_TYPE.OP_SELLLIMIT, bid+limitPrice, 0, volume, bid-limitPrice, ask+3*stopPrice, "", 0, 0)
In this expert advisor tutorial of Forex trading, we won’t discuss the APIs further. For more details regarding SDK trading, please check our other article: SDK Trading.
After done coding our own EA, we can copy the source code and paste the source code in the console dialog and run it to make it registered into the WEB Trader. Then you can see the new EA showing up in the EA list.
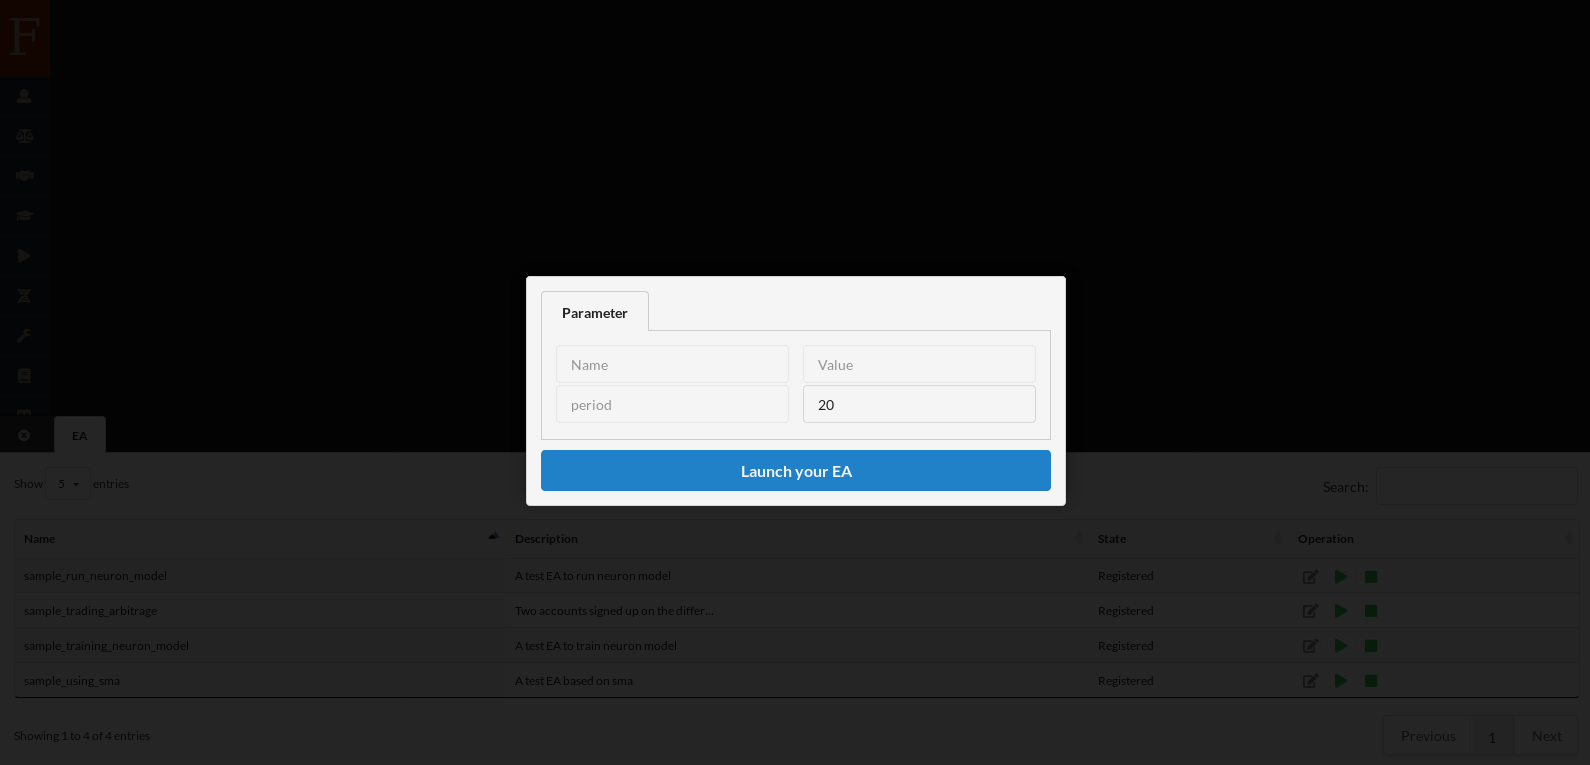
Now we can run the new EA to help us monitor the market movements and generate the signal when the “Golden Cross” pattern occurs. By clicking the “play” icon corresponding to the specific EA, a dialog will show up. And then we can set some value to the “period” field as a parameter and run it.
We can stop running it by clicking the “stop” icon corresponding to the specific EA.
Backtesting
Sometimes we need to verify whether our trading strategy works, backtesting is a good solution to verify our trading strategies without taking any risk.
Don’t worry about getting a loss, because the backtesting environment is a virtual environment, you won’t lose any funds. It’s a simulator where you can do anything to verify whether your strategy works or not. It won’t harm your live account at all.
We provide a WEB-based backtesting feature in our WEB Trader. It’s a unique feature different from the feature that other trading platforms provide. You can only find it in our WEB Trader.
You can open the backtesting page by clicking the “Game stick” icon. To start backtesting, first, start the EA. In this expert advisor tutorial of Forex trading, let’s backtest the EA named “sample_using_sma”.
Please click the “Play” icon corresponding to the EA named “sample_using_sma” to run it. Then a dialog shows up. Let’s launch this EA with the default parameter values.
Actually, you can run several EAs at the same time. In this expert advisor tutorial of Forex trading, to simplify the process, we only backtest one EA.
Now the EA is running, but the tick data is not loaded yet. We need to load the historical data quotes to make the chart run like you are trading in a real environment.
After clicking the “Play” icon on the menu bar on the left, a dialogue shows up. In this dialog, you can specify the settings for backtesting, such as the period of your backtesting, the initial funds, the timeframe, etc. If you want to see the whole progress of backtesting, please check the “Visible” option to make the progress visible.
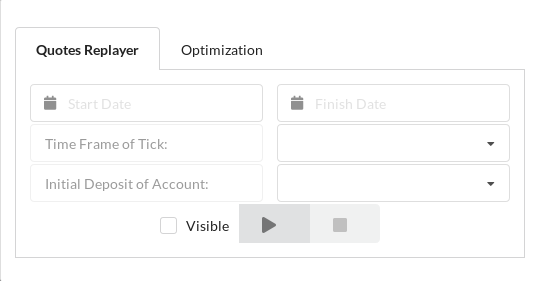
Now, run it. At the beginning of backtesting, it will start loading the historical data quotes. If the WEB browser has no historical data that you specified, the backtesting process will download the historical data from the server. It will take a few minutes.
When you see the chart start moving, it represents that the backtesting starts. If the EA sends orders, you will see some elements appear or disappear from time to time on the chart.
Let me explain the meanings of the elements:
- The blue circles stand for the “Buy” signals and the red circles stand for the “Sell” signals.
- If you see a circle with a solid line attached, that means a pending order was sent at the time when the circle appeared, it hasn’t been executed yet. The solid line warns us the price to execute the order.
- If you see a circle without a solid line attached, that means it was a market order and it has been executed.
- You may see some solid lines without a circle attached. The blue solid lines without a circle attached stand for the “Take-profit” values of the open trades. The red solid lines without a circle attached stand for the “Stop-loss” values of the open trades.
- You may see some dashed lines without a circle attached. The blue dashed lines without a circle attached stand for the “Take-profit” values of the pending orders. The red dashed lines without a circle attached stand for the “Stop-loss” values of the pending orders.
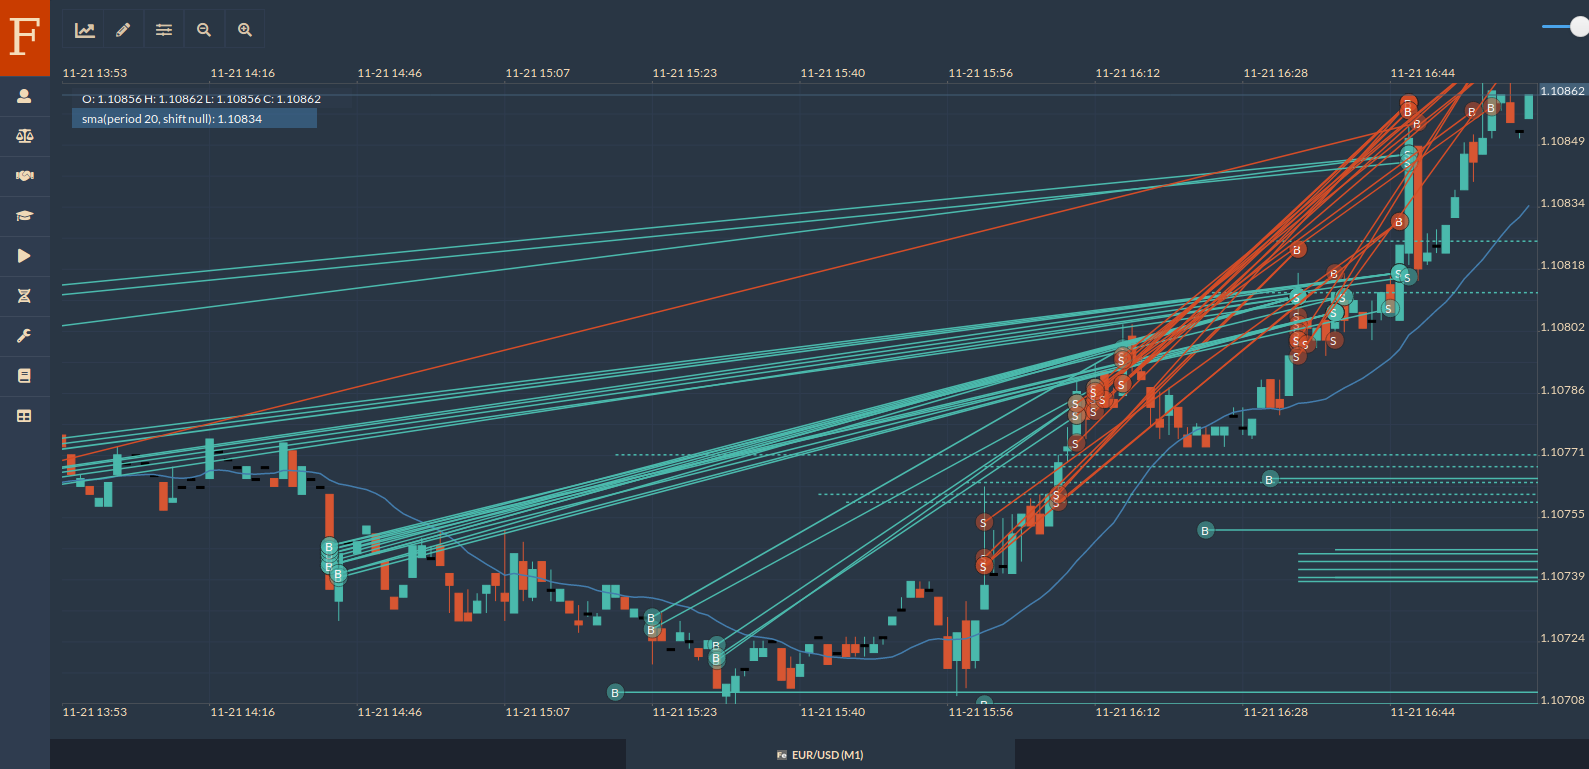
After the pending order is executed, the dashed line corresponding to the pending order will be rendered as a solid line. That means the “Take-profit” order attached to the pending order is activated, so is the “Stop-loss” order attached to the pending order.
The backtesting progress takes several minutes and during the backtesting progress, you can check the report at the same time.

If you are not patient with the backtesting progress, you can stop running it and then switch to the invisible mode. The invisible mode can speed up the backtesting progress.
The goal of this expert advisor tutorial for Forex trading is to introduce how to code and backtest your own expert advisor. If you have any questions, please contact us.